Showing posts with label baking. Show all posts

Friday, November 18, 2016

You tart!

She loves raw apple
Fall is finally here! Even though it's technically been here for a few weeks the weather is finally cooperating so that I can bake! I have been wanting to do a rustic tart for quite some time, so today I put Baby Fish on the counter and got out everything I needed to make a apple tart from scratch.

Monday, September 5, 2016

Because Caaaarbs...

Oh internet, why do you do this to me?  Easy No Knead Bread...Artisan Bread....I want to eat all of the carbs...


Saturday, October 31, 2015

Pumpkin overload!

I ended up with enough pumpkin to make two pies and still had some leftover!!!  My dogs will enjoy the bits of pumpkin mixed in their food over the next few days, and I really only made one pie...so what to do with the extra....I have one bag that will be destined for a Thanksgiving pie in a few weeks and I have one cup of puree that I have decided will become Pumpkin Pie Cookies

The recipe is simple!  Mix up the butter and sugar, then add the egg, pumpkin and vanilla...


Add the flour and spices and get it all mixed up and then after it's mixed, plop it on greased cookie sheets, or baking mats by the rounded table spoon and bake for 15-18 minutes


When the yummy cookies come out of the oven let them sit for 2 minutes.


Then move them to a wire rack to continue to cool!


Then you can glaze them with a little frosting drizzle!  It's part of the recipe so I guess I should do it!


Enjoy! And Happy Halloween!

Tuesday, October 27, 2015

Cold and rainy day, let's make pie!

It's 53° and rainy here today, perfect baking weather!  So while we were out and about today I picked up a nice sized pie pumpkin, or sugar pumpkin, so I could make some scratch pumpkin pie today!  Scratch refers to the filling, I cheated and bought a frozen crust...

Start off by cutting the pumpkin in half, removing the stem and all of the guts. I hang onto the seeds cause I love roasting them for a snack!


Then place them cut side down on a pan...


Cover with foil, and bake at 375° for an hour and a half!


While it was cooking I rinsed the pumpkin seeds...


The pumpkin is out of the oven and cooling


So I'm gonna roast the seeds while I wait for it to cool completely!  300° for 45 minutes stirring occasionally....and beg the hubbs to run to the store again, because while I was gathering the spices for the pie I realized I was OUT of Cloves AND Brown Sugar....how does this happen?!?!


It's time to scoop the flesh out of the skin and run it through a press, I have two options, a lever press or a, or a mortar and pestle type press (also known as a ricer).  Both will work, it's up to you and whatever you have on hand, and what you prefer!  You can also throw the cooked pumpkin in a food processor.  Ricing it just gives it a very smooth texture.


Then it's time to make pie!!!  I use a typical pumpkin pie recipe, like the one found on the can of Evaporated Milk....I'm sure I will "oops" the amounts of spices, cause I LOVE extra spices in my pie!!!  And I never follow a recipe exactly....


Mix it all together, pour into the pie shell...and I like to grind a bit of fresh cinnamon on top before I bake it...


Bake 425° for 15 minutes, then lower the temperature to 350° and bake for an additional 40-50 minutes.  Then it needs to cool for 2 hours, oh the torture!!  I had enough to fill the deep dish pie crust, and some for a plain bowl...which is why I love my Fiesta dishes!  I can put it directly in the oven and bake in it!!!


ENJOY!!!  We know we will!!!

Thursday, March 26, 2015

Up early to bake

I have been wanting to attempt scones for a while now.  Well attempt them again.  I have made them once before but they were savory, and took forever to make.  I found a new recipe to try so I got up really early (for me) so I could made a batch fresh before I went to my crochet group at church. I found the recipe online (click here) but wrote it down so it would be easier to make.


Thursday, November 27, 2014

Bring on the pumpkin!!!

Ah Thanksgiving.  A time to stuff yourself so  much you need stretchy pants!  I LOVE IT!  This  year I get to enjoy the cooking of others, except for the pumpkin pie.  That my dear readers, is my contribution to dinner this year!  And, I have help making it! Not that it's all that difficult to make...

I decided to try a new recipe this year.  One I found via Pinterest, it's a Classic Pumpkin Pie.  As usual, gather the ingredients,  I was using this opportunity to teach my helper a bit more about baking...

Get the oven going, in this case it's 425.  and then set out your pie crusts, I cheated and purchased mine...hee hee

Then get to measuring and mixing.


Carefully pour your filling into the deep dish crusts, and the extra goes into an oven safe bowl.

Bake as directed, mine took an extra 10 minutes, they look D-E-LICIOUS!!!

Have a very Happy Thanksgiving, and Enjoy!

Friday, July 11, 2014

Rhubarb Pie

Way back in the day, when we lived in Bolivar, Mo, my Grandpa's neighbor used to grow rhubarb, and would give it by the bag to my mom.  She would make Jam, and pie all summer long, and share it with him, my Grandpa and others.  It has been years since I had my mom's rhubarb pie.  Suddenly I have been CRAVING my mom's rhubarb pie...only I didn't have anywhere to get the rhubarb!  I eventually found someone who had it, in abundance and they gave me enough to make a rhubarb pie!!! And almost enough to make a batch of jam too!!!  But for now we made the pie.

Start by making the crust (thank you Mama, cause I'm still not the best at making these)

Then clean the rhubarb

and chop it up!  You are going to need 4 cups (or just a bit more)

Add the few ingredients (1/4 c flour, 1 cup sugar and 1/2 tsp orange zest)

Stir it up!

Dump it into the pie shell...

Dot with butter (use 2 Tbls)...

Put the top shell on and slit...

Then bake that pie for 10 minutes at 450 degrees, then lower the temperature to 350 and continue baking another 30 minutes!  After the pie is cool, refrigerate it until you are ready to slice and eat it!
Enjoy!
I know that next year I will be starting my rhubarb growing experience.  Because now that I have indulged, I will want more and more of this yummy plant!

Saturday, May 3, 2014

Mini me

In two short days I will be part of an annual Women's Tea.  I am hostessing my own table, and in charge of making cake.  I first thought, oooh cupcakes!!!  Then after getting on Pinterest and seeing the smorgasbord of ideas for having a tea party, ooooh petit fours!!!! So I attempted to make them...

After that long day and the unsatisfying results I decided it was the best and smartest idea to go BACK to mini-cupcakes. So I bought two box mixes. Tee hee!  For both mixes I substituted butter for the oil, and for the white cake I used half heavy cream and half 2% milk for the water.  for the lemon I used the juice of one lemon, and Sprite for the water.  I also zested the whole lemon and threw that into the batter too!

I think they turned out quite nice!


I am lucky enough to have two star tips for frosting.

The frosting part went faster than the baking part, thanks in large part to my mom!

Can't wait to dig into these tomorrow!

Tuesday, December 24, 2013

A bit of Holiday noms

There are very few people in this world that don't like Biscuits and Gravy, I was raised by two of them.  This is why it wasn't until I was an adult that I first tried, and fell in LOVE with B&G, and learned how to make it.  Which is good, because my DH also LOVES B&G.  He asks for it regularly.  We have even gotten desperate enough to chop up links or patties to make it!

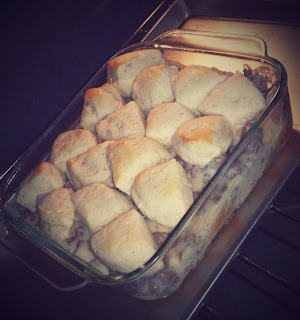
Well here I am on Christmas Eve morning, my DH still snug in bed, and me awake with my pooches and playing on Pinterest when I came across something sooooo yummy I just had to jump up and start cooking, before I even sipped my first cup of joe.  Biscuit and Gravy Casserole.  The bloggers words made me hungry, so here goes nothing!

Cut up the biscuits and put half of em in a pan, don't forget to grease it!  Those go in the oven for 10 min at 400 degrees!

Cook the sausage 

Make gravy per usual...

pour yummy gravy over precooked biscuits

top with the other half of the cut up biscuits

then cook for 15-20 minutes or until golden brown

grab a fork and dig right in!

Now I need to figure out what to do on Christmas morning!

Wednesday, December 4, 2013

Just add vodka

The holidays are not around the corner anymore, they are upon us!  And with the change in the weather (yesterday it was in the 60's, and today it's below freezing) it is time to break out the recipes and start baking!  There are a few recipes that are only out this time of year, so not all of the ingredients may be on hand!  Specifically anise extract which is needed to make Pfeffernuesse Cookies!  These beauties are super delicious so keep an eye out in the next week when I get together with my Mom and start baking!

So instead of going out and attempting to find Anise extract I searched for how to make it.  Why make it?  Because, I have star anise on hand and, why not? Did you know that you can make almost any type of extract you want?

You start with whatever you want to extract, in my case it's Anise

Put some in a glass jar

The add the vodka and close it up!

Let it sit "a while" and check it for strength, you can always add more vodka or let it sit longer!

Saturday, November 30, 2013

Gluten for punishment (bun intended)

As if baking and cooking for the holidays wasn't enough, tomorrow I decided to tackle my delicious Low n Slow BBQ Pork Roast.  And I wanted fresh bread to go with it.  Not rolls, but artisan bread!  So this is my adventure into making "Easy Homemade Bread" I found this recipe on Pinterest and have been keeping it in my To Make folder for just the right occasion.  The blogger who posted the recipe makes it sound soooo simple!  So here we go! (start time 6pm)

Gather the ingredients, and there really aren't many...

Then combine everything in a large bowl and mix till combined. I ended up having to do it by hand, because I couldn't get it mixed with the wooden spoon I was using.  Next time I am definitely using the dough hook and the stand mixer.

The cover with plastic wrap and let it sit for 12-18 hours.

Fast forward to today and I must have done something right because is has risen and smells soooo yummy!

Time to take it out and form the loaf

And place the loaf on a floured piece of parchment paper because I don't trust just flouring a towel, especially one that my mom made me! Then wrap that bad boy up and let it rise at room temp for 1-2 hours or until doubled.
About 30 minutes before it's time to bake this you need to get a dutch oven or other oven safe pot and put it in a cold oven and the heat the oven to 425

Now that it's risen it's time for the difficult part, this is the part that scares me a bit to be honest. You get the super hot dutch oven out of the oven and flip the dough into the pot, seam side up...

...Mercy, and here we go!


Ok, that wasn't too bad, heavy, and flour poofed everywhere but it's also cleaning day here so no big deal.  Let it bake for 40-50 minutes

I wish you could smell via blog, cause my house smells soooooo good right now!

When the timer goes off remove the lid and let it bake for another 5-10 minutes until the top is a yummy golden brown.

The original blogger warns that once it's done, you put it on a cooling rack to let it cool and don't cut into it until the crackling stops, so hard to not start munching, but I'll be a good girl and wait till dinnertime.

Store in the dutch oven on the counter-top until you have eaten it all, or you could use it for croutons or in a breakfast casserole!