Thursday, November 27, 2014

Dog sweater

I had the darndest time trying to start a new crochet project.  I don't think I have ever had such a time trying to decide what to do.  I've had this fun funky self patterning yarn for a while now.  And I was looking for the "just right" project for it.

I don't know how many times I started and stopped various projects with this yarn, and other yarn, before I finally settled on a dog sweater for my beagle Hammond.  And not just any dog sweater.  This pattern is supposed to be the end all be all of dog sweaters,  based on your dog's individual measurements...it's not a pattern as much as it is a tutorial.  And best yet, it's FREE!  Yup...head on over to Jenna Wingate Designs, and download the PDF!  I LOVE free patterns!!!  If I wasn't distracted by things like cooking and cleaning I would have been able to complete this project much faster.

As it is, my pup hasn't wanted me to take this off him, even when I was just trying it on for fit while I was working on it!

But now that it's completed he has been snug as a bug in a rug.

Stay warm!

Bring on the pumpkin!!!

Ah Thanksgiving.  A time to stuff yourself so  much you need stretchy pants!  I LOVE IT!  This  year I get to enjoy the cooking of others, except for the pumpkin pie.  That my dear readers, is my contribution to dinner this year!  And, I have help making it! Not that it's all that difficult to make...

I decided to try a new recipe this year.  One I found via Pinterest, it's a Classic Pumpkin Pie.  As usual, gather the ingredients,  I was using this opportunity to teach my helper a bit more about baking...

Get the oven going, in this case it's 425.  and then set out your pie crusts, I cheated and purchased mine...hee hee

Then get to measuring and mixing.


Carefully pour your filling into the deep dish crusts, and the extra goes into an oven safe bowl.

Bake as directed, mine took an extra 10 minutes, they look D-E-LICIOUS!!!

Have a very Happy Thanksgiving, and Enjoy!

Friday, November 21, 2014

One of the many things to do with Venison

Venison has been processed and the ground portions are sitting in my fridge in my turkey pan....being that Thanksgiving is a week away, I needed to do something to get it OUT of my turkey pan.  I looked up recipes for making venison summer sausage and settled on one.

So I went to the local grocery store to get the stuff I needed to make summer sausage, and to get some beef fat to add to the ground venison.  One site suggests a 10% ratio of fat to meat, so for 20 lbs of ground meat I needed 2 lbs of beef fat.  The butcher was more than happy to give me as much beef fat as I wanted, for FREE!  Which makes the overall cost of our venison uber cheap!!!  As in pennies a pound. We used the same grinder to grind up the beef fat.  And while DH was slicing up the fat chunks, and grinding away I started mixing up the sausage.

For this recipe I used three pounds of venison, and two pounds of ground beef.

One of the ingredients is fresh ground pepper, and I wasn't about to take the time using my hand grinder, so I dumped the peppercorns in my spare coffee grinder and went to town.


The spices and water get mixed together in a bowl and then added to the meat.  I did increase the garlic to 2 tsp instead of the 1 tsp they called for.  I LOVE garlic.


The next step is to mix for two minutes, so I removed my rings, and washed up real good....then dug in with both hands

Once two minutes is up, time to cover with plastic wrap and allow to sit in the fridge at least overnight, but no more than three days, mixing once a day.


Set the oven to 350,


and start forming the logs, about 2" in diameter.


You will also need either a broiler pan, or a pan with a rack over it.  If you don't have access to either of those things, you can put a drip pan under the middle rack and place the sausages directly on the oven rack.  Just remember you will have to clean the rack afterwords.


After the sausage has baked for an hour and a half, remove from the oven and take them out of the foil and put them on paper towels to absorb the rest of the fat.


Then once cooled (or while hot if you just can't wait) slice and serve!


Happy Snacking!

Wednesday, November 19, 2014

It's deer season, and yes this post has pictures!

I got my hunter safety permit years ago, but unfortunately my first season out, didn't get a deer.  In fact I haven't been out since that first season.  I don't have a proper deer rifle!!  My husband has one, and I used it that first year.  Maybe soon I can get one, then I too can go hunting!  I love venison, it's hormone free, free range, and very lean!  Not to mention very versatile. I cannot wait to start making yummy things with this beautiful deer.

With the temperatures bottoming out this past weekend I was not sure if my husband would be successful getting a deer.  He went out Sunday late morning to his hunting spot, and didn't see anything.  Then got up super early Monday morning (like 3am) to head back out so he could be in place when the sun came up.  By noon he hadn't seen anything except a bobcat...and he was coooooold!  Fortunately just a while later (like three hours later) a gunshot on another property spooked a doe out of her hidey hole and into his range.


After taking the requisite picture to send to me, he did the field dressing, don't worry, no pictures of that, and loaded her up for the hour and a half trip back home.  Now I have to say, we have the BEST neighbors ever, we borrowed a cherry picker (engine hoist) from one neighbor, and another came down to help us process it!  I'm not gonna post a ton of pictures, cause honestly my hands were icky because I was helping process...  But after skinning we started removing the meat.


And then all of the meat went into a cooler overnight.

The next day we started removing all of the fat and silverskin...

...and chunking it...

...to so we could grind it into burger...
...which is now sitting in the fridge, we still need to add some beef fat, not a lot, and then I will be making jerky, summer sausage, and a bunch of yummy things!  Hopefully he will get another deer either next weekend, if the weather cooperates, or during the antler-less portion that is the first week of December. 

Until then...Happy Eating!


Friday, November 14, 2014

When will I ever learn to follow a recipe exactly?

My brother and sister-in-law are headed home for a short stay.  Super excited to see him, and hopefully share some meals...between the two of us meal planning can be difficult, see I'm very much a meat eater, and he and his wife are veggies...and not only are they veggies, but he is allergic to nightshades...so no tomatoes, potatoes, peppers (spicy or otherwise) or paprika and many other ingredients...and I don't like tofu.  Most of the vegetarian meat alternatives have tomatoes in them...ugh!  Fortunately I found a recipe for Minestrone soup, that I will have to tweak to rid of the nightshades.  Ridding a recipe of the tomatoes is difficult, but doable.  You can double the other veggies to replace the bulk of the tomatoes, and add more water to replace the liquid of a can of tomatoes.

I was going to cook this in my large cast iron dutch oven, but alas, I cannot because even cooking near potatoes is enough to spark an allergic reaction, so my handy stainless steel stock pot will work.

Heat the oil, then sauté the onion, celery, carrots and garlic until soft,

Add the Celery Root or Jicima , zucchini, butternut squash (or pumpkin), and broth, and pasta.

Ensure the mixture is covered by liquid by at least 1 to 2 inches, adding water to cover if needed.

Bring to a boil, and then cook for about 20 to 30 minutes over low heat until vegetables are tender.
Add the parsley, basil, salt and pepper and mix well. I also added some thyme and oregano.

Add the kidney beans, Boca crumbles, and chopped greens, cover and simmer an additional 15 minutes.

Serve warm, with a drizzle of the pesto oil mixture on top.  It's the perfect meal for a cold night!
You can also make this non veggie by using chicken or beef stock, and adding cooked crumbled Italian sausage.  Which is what I did for pot #2, because I didn't measure the ingredients and ended up with a TON of soup!  Good thing I can bag this up and freeze it!!!

Monday, October 27, 2014

Furniture Facelift

A few months ago I found a counter height table set at a local flea market.  I got a decent deal for it.  There are a few small scratches on the top (which I will fix eventually) and the cushions on the chairs needed some help.  I'm not a huge fan of white or off white...not with a mechanic in the house.  So one day last week I was perusing the fabric department at Walmart and found a lovely upholstery fabric on clearance!  It was such a good deal I couldn't pass it up so I got enough to do my dinning chairs, and the folding chair set I also picked up at the flea market.


When you are recovering something as simple as a seat cushion you need a few tools.  Fabric and scissors, the correct screw driver if you are taking seats off a chair like I did, and a staple gun,

Take the cushion off the frame and set the frame aside, but be careful to not tip the screws out of their holes.

Lay the cushion on the square of fabric, with the print down.


Start on one side and put one staple in the center


Then carefully add three or four more on each side of the center staple.  Turning the corners is the most difficult part, just manipulate the fabric until you like the way they look then secure with several staples

Cut the excess fabric off.

Reattach to the chair base and you have updated your look quick and simple!

Sunday, October 26, 2014

Rags to dolls

The history of rag dolls is interesting, most of them are made with cloth, spare scraps and are even stuffed with the same.  One was even found buried with a child in Rome, dating back to 300 BC.  Today you can find rag dolls on Etsy, or other such sites for sale, most made with old materials or vintage findings.  These dolls can be expensive (to say the least) and some are too precious for every day loving.

One one of my many trips to the library here in town I found a book on how to make rag dolls.  The book is The Making of a Rag Doll: Design & Sew Modern Heirlooms and can be found on amazon by using the link.  I think the book is a great idea, but I did find after reading the book, and tracing the patterns, that the pattern that is provided in the back of the book is TOTALLY different than the dolls she shows in the pictures.  I created one such doll, and ended up altering the pattern  as provided, and still wasn't sold on the results...don't get me wrong, my doll is SUPER cute and I will make more of these, but after doing more research I see where the differences lie.


To start, the body pattern is all wrong,  Jess' dolls have a wider neck, and the arms are attached separately.  Secondly and what I think is MOST important is the book pattern shows the back piece in two pieces...but her dolls are made with matching front and back pieces and are stuffed a different way.  I will be altering my patterns to be more like the Jess dolls.  The knickers are a lot longer in pattern than in pictures, but the dress and apron I made match well.  I did add the crocheted shawl to my doll, just to add that touch of me. And used yarn for hair instead of the strips of fabric Jess suggested.  I don't want to sound ungrateful for the pattern, but if I had purchased this book thinking I was going to get the pattern that she used and found out afterwords that it is a totally different pattern, I would be taking the book back for a refund.

I started a new doll, based on the pattern from Jess Brown.  I altered the pieces on the back of the body/head.  I did remake the patterns, this time using something that will hold up to repeated pinning, Card stock works well for this pattern.  You can pin it multiple times and make a lot of dolls!  Start by gathering the tools you need; patterns, good fabric scissors, iron, fabric, needle and thread for the hand work, the yarn or other fiber for the hair, some frey stop (or you can just sew the edges) and some liquid stitches.


Iron the fabric and pin the pattern according to directions.


Then cut everything out.  I was working like a dervish because I am me, and that is what I do.  Head down and forget to take pictures!  But I can say that I will alter the above pattern even more because I ended up trimming the back of the head quite a bit before I liked the way it looked.  After everything is stitched and turned right side out I decided to tea stain the fabric.


I didn't leave it in very long, just long enough that it wasn't bright white anymore! Wring the pieces out, and if you want you can toss them into the dryer to speed things up, otherwise lay them out and let them air dry.  In the meantime you can begin making the clothes.  I am in love with the sundress pattern that Jess provides so I went with that


After the dress was cut out, embelished and stitched up I turned my attention to stuffing the legs and arms (while watching Game 4 of the World Series) and getting the legs attached to the body, and the body stuffed.  After stuffing the body it's time to close up the hole in the back.


I chose to use dark thread, and as soon as my bobbin is empty I will be using the dark brown to sew the doll too.  Again because I was watching baseball I did not stop to take any pictures of sewing the face, or the arms, or the hair.   But I'm sure if you read the book you can figure out how to put the pieces together.  For this doll I did not use buttons on the shoulders like I did on the first one.  And the dress straps are actual bias tape straps made out of the fabric of the dress.  I still need to make bloomers and a messenger bag for her, and if I have time a small book full of uplifting educational phrases.  This doll is being donated to P.E.O. Chapter NI for the annual auction next month.


Wednesday, October 1, 2014

Reviving an almost lost art

The year we moved to our new house we were given two beautiful quilts at Christmas.  Both quilts were made by my DH's Grandma and Mother.  Treasured pieces, heirlooms.  My parents have two quilts that were made by my father's mother.  And we still have a crocheted afghan that my mom's mother made.  I still have a picture of her making that afghan.  Handmade items are making a comeback. And I'm glad to be on that bandwagon!

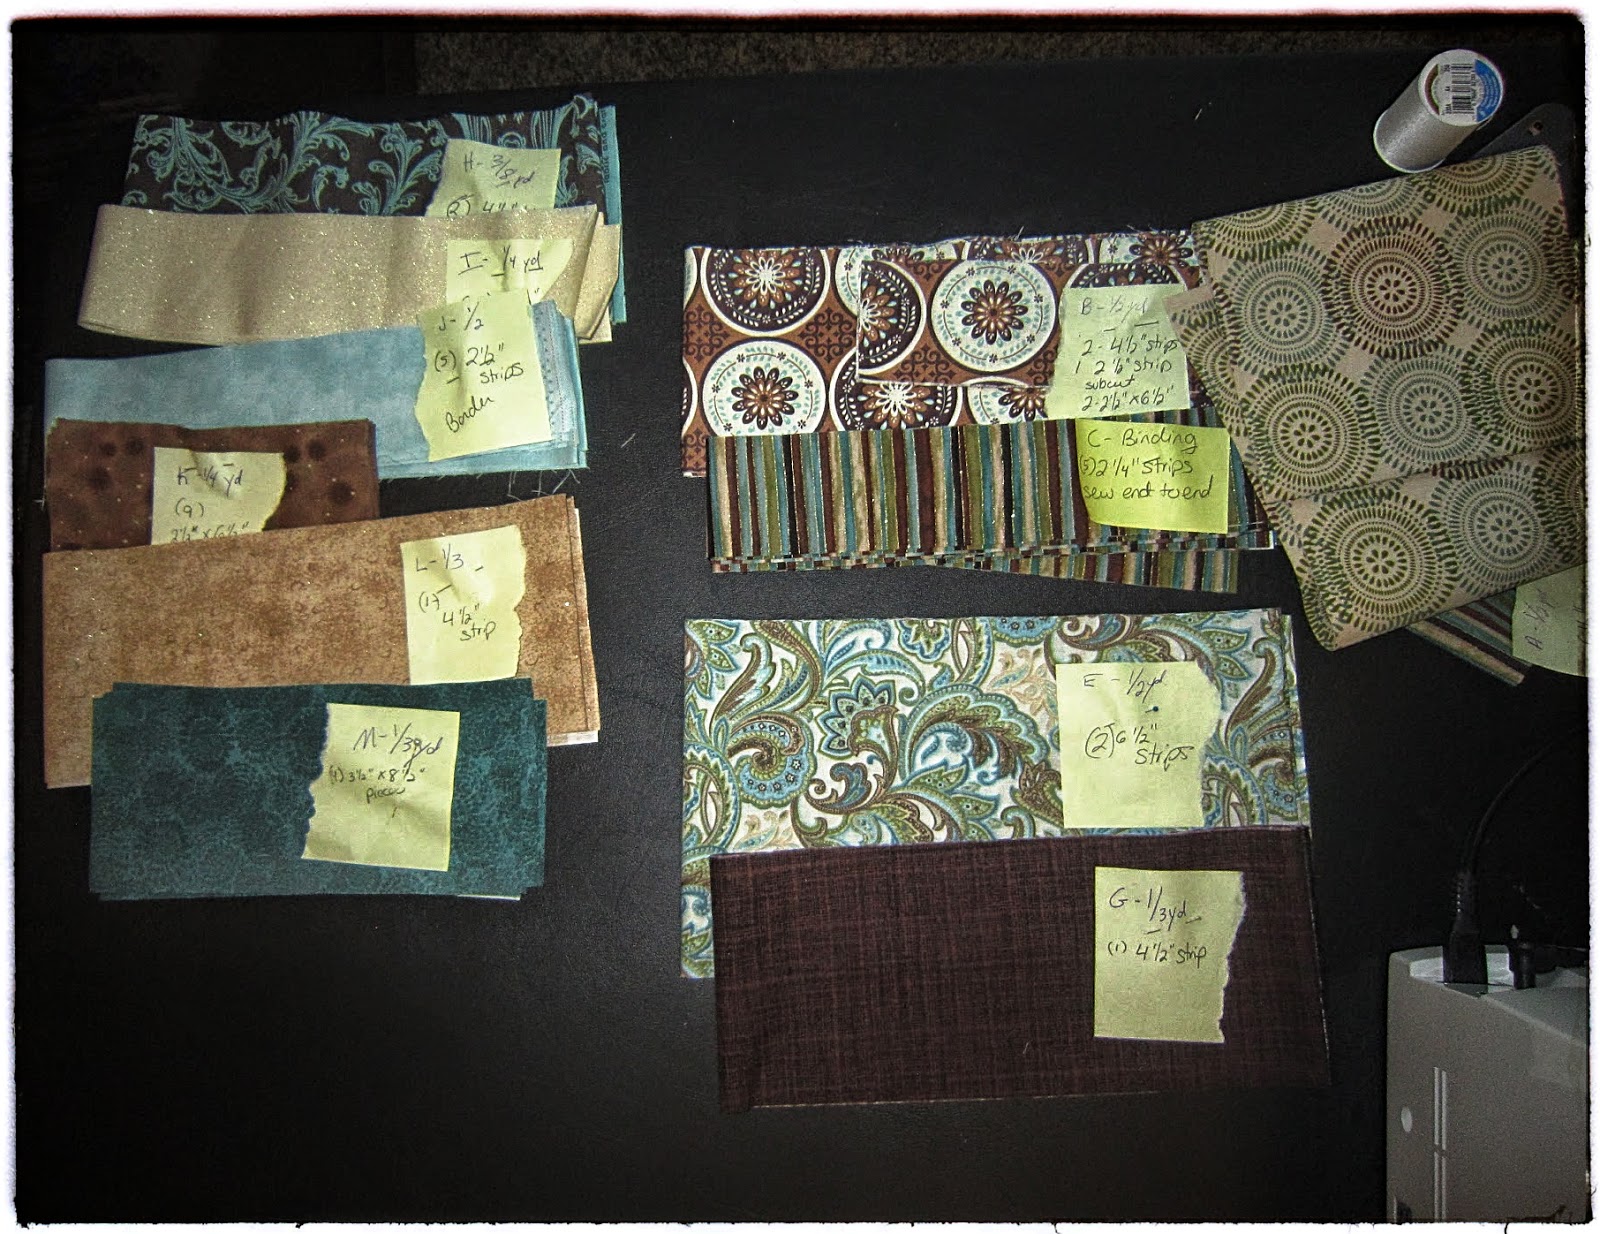
The scrap that started it all
Back in May I was out with one of my neighbors getting paint for her house.  I noticed a lady using a piece of fabric to find a paint color. Even from a distance I fell in love with that scrap of fabric.  It had the colors that I have been using all over my house, and I loved the not so even stripes. Being the outgoing person that I am I went up to her to find out where she got that beautiful piece!  JoAnn Fabric of course, and being the nice person she was she gave me a piece of that scrap so I could take it with me to find it.  Upon closer inspection there was some gold sparkle woven between color stripes, and I was even more excited on what I could create with it.

I had only just recently joined the quilting group at church, and I knew I had a lot to learn.  But I was ready to try my hand at making a simple first quilt.  After consulting with the quilt guru at our group I found several patterns that were contenders, and eventually settled on trying a quilt I found on Pinterest.  The PDF is free, and I cannot link to the original site I got the pattern from.  But I did luckily download that pattern, and you can get it HERE.

My mom and I went shopping for the fabrics.  The pattern called for flannels, but you can substitute regular cotton fabrics.

Once you have everything LABELED (and trust me, you will want to label everything with a sticky note and a pin) grab your iron and carefully iron out any creases and lines. But don't smoosh it around, press it,  you don't want the fabric stretching.  Then grab your pattern, and your tools and take a deep breath, because it's time to start cutting the fabric!!!

There is a saying in construction, and it's true for sewing too.  "Measure twice, cut once"  No one can really say who uttered these words first, or a variation of them, but the phrase and meaning has been traced back to 1560 AD, but who knows if it was used even earlier.  And if that phrase has been around that long, you best believe it is sound and solid advice.  You cannot uncut fabric.  And although you do end up with extra bits and pieces, you don't want to mis-measure multiple times, otherwise you will end up having to go BACK to the store and hope they have more of the fabric you originally chose.

As I cut the pieces I added information to my labels, I wasn't sure how much time this would take and I wanted to make sure if I needed to leave the project and then come back to it I would not be confused at where I left off.  I also used a pencil to put check marks after completing a step or cut.

After getting the strips cut to size, start with step one, sew the indicated pieces together.

A good pattern will tell you which direction you need to press, and I mean PRESS the fabric.  Again, don't smoosh the fabric it will stretch it which results in a ripply quilt top, and if you are going to take the time to make a quilt, you want to do it right!
Press, don't smoosh
After the strips are sewn together then you get to cut them into the sub pieces.  Measure carefully!

It went really quickly from there, the sub cuts get sewn together into blocks, then the blocks get sewn into strips.

Once the strips are sewn together it's time for the border.  This step for some reason gave me a hard time.  You can butt the ends of the border fabrics together, or you can miter them.  I chose to miter, and the first time I sewed the pieces together realized that I sewed a right side to a wrong side, after I had already trimmed the excess...of BOTH pieces...oops...time to try again and the third time was a charm.
Double check before you cut mom!  Duh!

Sewing the border to the main part of the quilt took a lot of patience, and a lot of pins.  You don't want that thing to move while you are sewing!


Then before you know it, the top is done, and you can sandwich the quilt! It helps especially if you are a newbie like me, to have multiple helpers that know what they are doing.

It takes a LOT of safety pins, a lot more than you think.  After the backing, batting and top are pinned together you can start doing the quilting process.  I am doing diagonals, 3" apart over the face of the quilt.  It will give it a diamond pattern.  I am doing the quilting myself, mostly because I didn't have enough of the backing fabric to extend 6" on all sides which is what is requested when sending a quilt to a long arm quilter.  This is small enough I should be able to handle it myself.  I got some quilters tape, to mark the lines I want to sew.  Make sure you read the label, and don't sew through the tape, or leave it on your fabric for longer than 24 hours.


The final step to creating a quilt is to put the binding on, it is a multi-step process, and one of many ways to bind a quilt.  I think it is fairly easy to create a beautiful binding this way.


The final step is to hand stitch the binding to the back of the quilt.  I still have to do this final step.  I have a ton of other projects that need my attention so it may take a while to get to it, but I will eventually get it done!  I just wanted to be able to share my labor of love. I promise to share a picture once it's all the way done!

Enjoy, and go create something!