 |
| Photo from Tip Hero |
Showing posts with label Pinterest. Show all posts
Showing posts with label Pinterest. Show all posts
Saturday, October 15, 2016
Facebook Food
Of all of the things on Facebook right now my favorite to see are the various recipes. I have several friends that love sharing the yummy treats they see...my stomach says yes, my hips say no...I have pinned several of them on my Pinterest boards including the Shepherd's Pie Potato Skins!
Wednesday, July 13, 2016
I get to do a project!
Hello my readers! I know it's been a while, but that's how it goes when you have a baby! She's growing like crazy and changing every day!

If you have followed my blog at all over the last few years you are familiar with my pup Fergus, and his penchant for barking at EVERYTHING. So much to the point that I've had to put in a window covering to block his view, and unfortunately mine.


If you have followed my blog at all over the last few years you are familiar with my pup Fergus, and his penchant for barking at EVERYTHING. So much to the point that I've had to put in a window covering to block his view, and unfortunately mine.

Tuesday, November 10, 2015
Recipes are guidelines, right?
I've said it before. I hardly ever follow a recipe exactly. Even when baking I add more spices than required because I love flavors! Tonight my pregnant self decided to try a new recipe I found on Pinterest. The name of the blog that featured this yummy photo is Bacon, Butter, Cheese & Garlic. The recipe? Baked Italian Chicken And let me tell you, the picture is SUPER enticing! See?
You want to make it now too don't you? And remember I'm pregnant, duh, so any blog that features some of my favorite ingredients must be a hit! The only issue I had with this when I started gathering my ingredients was that I noticed that the recipe doesn't include bacon....an oversight I'm sure! I also switched out minced garlic for the garlic powder.
So I decided to add bacon! It is a common pairing with chicken (at least in my house), so why not?

While the bacon was starting to cook I got to chopping....onions and tomatoes

The onions go into the pan with the bacon and the mushrooms (I got the pre-sliced)

While those are cooking I put the chicken in a pan...

And melted the cream cheese and mixed in everything else, and ran out of room in my bowl to add the spinach, so I just covered the chicken with it...

Then topped it with the cheesy-bacony-yummy sauce!

And popped it in the oven at 350, for 30 minutes...I think it is going to take a lot longer than 30 minutes, I checked it halfway through and the chicken is still VERY raw looking.....we shall see...in the meantime I am having a VERY hard time not eating the other half of the Italian bread I purchased to go on the side....VERY hard....

Once I determined we would actually be able to eat this meal sometime tonight...I started the Linguine I am serving the chicken on. And put the garlic bread in the oven. And sprinkled the shredded cheese all over the top of the dish!

Next time I am going to brown the chicken in whatever is leftover from the bacon onion and mushroom pan....give it a head-start to cooking! But this time, I'm just going to chow down, because I'm hungry and this smells soooooo good!!!!

Enjoy!
 |
| baconbuttercheesegarlic.blogspot.com |
You want to make it now too don't you? And remember I'm pregnant, duh, so any blog that features some of my favorite ingredients must be a hit! The only issue I had with this when I started gathering my ingredients was that I noticed that the recipe doesn't include bacon....an oversight I'm sure! I also switched out minced garlic for the garlic powder.
 |
| The artichokes are being drained...hence the reason they are not pictured |
So I decided to add bacon! It is a common pairing with chicken (at least in my house), so why not?

While the bacon was starting to cook I got to chopping....onions and tomatoes

The onions go into the pan with the bacon and the mushrooms (I got the pre-sliced)

While those are cooking I put the chicken in a pan...

And melted the cream cheese and mixed in everything else, and ran out of room in my bowl to add the spinach, so I just covered the chicken with it...

Then topped it with the cheesy-bacony-yummy sauce!

And popped it in the oven at 350, for 30 minutes...I think it is going to take a lot longer than 30 minutes, I checked it halfway through and the chicken is still VERY raw looking.....we shall see...in the meantime I am having a VERY hard time not eating the other half of the Italian bread I purchased to go on the side....VERY hard....

Once I determined we would actually be able to eat this meal sometime tonight...I started the Linguine I am serving the chicken on. And put the garlic bread in the oven. And sprinkled the shredded cheese all over the top of the dish!

Next time I am going to brown the chicken in whatever is leftover from the bacon onion and mushroom pan....give it a head-start to cooking! But this time, I'm just going to chow down, because I'm hungry and this smells soooooo good!!!!

Enjoy!
Monday, June 29, 2015
Cleaning with Dawn Dish Soap!
In the recent years there has been a swing towards natural cleaning agents. Bleach is a thing of the past, or it should be, I really dislike the smell of bleach, and the side effects of using it while cleaning. You know the ones, bleach spots on your clothes, having to wear gloves (or should wear) to use it, and it's not exactly kid friendly. You can find a ton of cleaning alternatives on Pinterest, and all over the internet. I have been using Dawn dish soap for years as a dog shampoo. There are lists of other things you can do with it, from weed control, to people shampoo, to bathroom cleaner, even window cleaner. I hate wearing gloves when I'm cleaning so I decided to try the tub and shower cleaner found on One Good Thing by Jillee

It was worth a shot so I gathered what I needed..

Wow was that super stinky! Burned my throat breathing in the vinegar stench....at least it's not toxic right?!? Next time I will turn the fan on for sure...but I got it all sprayed in the shower, and the toilets just to see, and walked away to continue dancing my way through cleaning the bedroom...I came back a few minutes later (like the how-to said) and started spraying it off the shower walls....I don't know what kind of "gunk, slime, sludge and other stuff" the blog gal has in her shower, but mine wasn't budging....time to break out the Mr Clean Magic Eraser and get to scrubbing....and grumbling. I will say it came off easier than normal with the Eraser after soaking with vinegar and dawn. And it even took the hard water stains on the shower doors, with a bit of elbow grease...The blog gal must not have a mechanic in her house...cause that grease gets everywhere and is a pain to get off. But my shower is sparkly now!

My toilets are clean too, but again, I had to scrub with the toilet brush, and had to break out the gloves...I will use it again, but I know it's not a magic cleaner, nothing out there is...but it works better, with scrubbing, than other cleaners I have found, and I would rather use Dawn and Vinegar than commercial cleaners!
Happy Monday, and Happy Cleaning!
Monday, May 25, 2015
Memorial Day projects!
A beautiful Monday, Memorial Day, and instead of doing a BBQ we have been working on projects around the house. My DH found a lot of 2x boards in the garage so instead of buying some to make a bunkey board for our antique bed we just used what we had!


Thursday, November 27, 2014
Bring on the pumpkin!!!
Ah Thanksgiving. A time to stuff yourself so much you need stretchy pants! I LOVE IT! This year I get to enjoy the cooking of others, except for the pumpkin pie. That my dear readers, is my contribution to dinner this year! And, I have help making it! Not that it's all that difficult to make...

I decided to try a new recipe this year. One I found via Pinterest, it's a Classic Pumpkin Pie. As usual, gather the ingredients, I was using this opportunity to teach my helper a bit more about baking...

Get the oven going, in this case it's 425. and then set out your pie crusts, I cheated and purchased mine...hee hee

Then get to measuring and mixing.

Carefully pour your filling into the deep dish crusts, and the extra goes into an oven safe bowl.

Bake as directed, mine took an extra 10 minutes, they look D-E-LICIOUS!!!

Have a very Happy Thanksgiving, and Enjoy!
I decided to try a new recipe this year. One I found via Pinterest, it's a Classic Pumpkin Pie. As usual, gather the ingredients, I was using this opportunity to teach my helper a bit more about baking...
Get the oven going, in this case it's 425. and then set out your pie crusts, I cheated and purchased mine...hee hee
Then get to measuring and mixing.
Carefully pour your filling into the deep dish crusts, and the extra goes into an oven safe bowl.
Bake as directed, mine took an extra 10 minutes, they look D-E-LICIOUS!!!
Have a very Happy Thanksgiving, and Enjoy!
Thursday, August 21, 2014
Easy Apple Butter
One of the great things in life are freshly made jams and jellies. Last week a friend from church gave me some Gala apples from the tree in her yard. I made a few fried apple pies, and then I decided that I wanted to make apple butter. I have always like apple butter that you can get at street fairs like Apple Days in Weston, Mo. but I had never made any myself. A few clicks around Pinterest I found a simple recipe for a small batch of Apple Butter.
First you gotta soak the apples, well you don't have to, especially if you know where you got the apples. I chose to soak mine just in case there were wormies, do a 3-1 ratio of water and plain white vinegar.

After the apples are soaked and measured, you need about 4 lbs of apples, I did a lot more than 4 lbs. I did close to a double batch, a few more than double. Quarter the apples and take out any icky spots. Add 2 cups of water and 1 cup of apple cider vinegar per 4 lbs. It seems like a LOT of liquid but it will come out in the end, trust me.

After the apples have cooked and are mushy, it is time to get out that fancy-schmancy food mill. Do some stretches and start mashing! This part takes some time, and you really have to use your muscles, but it can be done! This is why it is so nice having a second set of hands available, you can take turns mashing and giving your muscles a break!

Once everything is milled measure out the pulp. You need half a cup of sugar for every cup of apple pulp. I decided to only finish out half the pulp this go round. So I had 8 cups of pulp, and 4 cups of sugar. Then add the spices, lemon zest, and lemon juice. You will need zest and juice of one lemon for every 8 cups of pulp.

Then it's time to simmer it and stir for one to two hours. Again, a good time to have a second set of hands so you can get a break from stirring. We also decided to use a bar stool near the stove so we didn't have to stand the whole time. My buddy Fergus joined me to keep me company while I was stirring.

Our batch didn't take the whole two hours to cook down, it was shortly after the first hour that we realized it was ready to go. Thick and smooth!

Make sure you follow the steps for canning, you want to make sure everything is sterilized properly so the product can be shelf stable. Again, having a second set of hands to help get the jars filled and into their hot water bath.

10 minutes is all you need! Pull them out of the water bath and listen for the pop! Then they need to sit out for 24 hours before you move them around a lot.

Enjoy!!
First you gotta soak the apples, well you don't have to, especially if you know where you got the apples. I chose to soak mine just in case there were wormies, do a 3-1 ratio of water and plain white vinegar.
After the apples are soaked and measured, you need about 4 lbs of apples, I did a lot more than 4 lbs. I did close to a double batch, a few more than double. Quarter the apples and take out any icky spots. Add 2 cups of water and 1 cup of apple cider vinegar per 4 lbs. It seems like a LOT of liquid but it will come out in the end, trust me.
After the apples have cooked and are mushy, it is time to get out that fancy-schmancy food mill. Do some stretches and start mashing! This part takes some time, and you really have to use your muscles, but it can be done! This is why it is so nice having a second set of hands available, you can take turns mashing and giving your muscles a break!
Once everything is milled measure out the pulp. You need half a cup of sugar for every cup of apple pulp. I decided to only finish out half the pulp this go round. So I had 8 cups of pulp, and 4 cups of sugar. Then add the spices, lemon zest, and lemon juice. You will need zest and juice of one lemon for every 8 cups of pulp.
Then it's time to simmer it and stir for one to two hours. Again, a good time to have a second set of hands so you can get a break from stirring. We also decided to use a bar stool near the stove so we didn't have to stand the whole time. My buddy Fergus joined me to keep me company while I was stirring.
Our batch didn't take the whole two hours to cook down, it was shortly after the first hour that we realized it was ready to go. Thick and smooth!
Make sure you follow the steps for canning, you want to make sure everything is sterilized properly so the product can be shelf stable. Again, having a second set of hands to help get the jars filled and into their hot water bath.
10 minutes is all you need! Pull them out of the water bath and listen for the pop! Then they need to sit out for 24 hours before you move them around a lot.
Enjoy!!
Wednesday, April 17, 2013
It's a gloomy day, time to bake away!
As I've mentioned on other posts, Pinterest will be the death of my current wardrobe. So many recipes, so little time...well used to be little time, but now I'm home more than I'm not so I can experiment in the kitchen, and blog about it, even more!
Today is the day I have been waiting for. Overcast, a bit cold, and rain possibly even thunderstorms! Last week I wanted bananas, so I bought three, two were already more ripe than I care to eat, and bruised. So I left them on the counter until today, and now they are PERFECT for banana bread. But wait, what did I find on Pinterest?
Oh yes, a delicious banana cake! So now I have something new to try! Click here for the recipe.
 To start as always, gather your ingredients, I know it seems silly, but getting everything ready will make sure that you have everything you will need!
Then turn on the oven, to 375
 I know that the original recipe says this can be done by hand, but I prefer to use a blender to make sure it is smooth. Nothing is worse than getting chunks of butter, or banana in an otherwise perfect piece of bread, or in this case, the cake. Start with the butter, sugar, sour cream and egg.
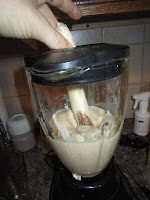 When it is smooth add the vanilla and the bananas. When you are using the blender it is not necessary to pre-smash the bananas. Which makes this an easier way to make this recipe.
While the bender is doing it's thing, grab a separate bowl, and mix the flour, baking soda and salt.
 As most people know, I can never follow a recipe as written, I noticed with this recipe there is no cinnamon, or allspice, so I added 1/2 t cinnamon, and 1/4 t allspice to the flour mixture before pouring the pureed banana mixture into the bowl.
At this point mix, scraping the bottom of the bowl well and pour into a greased 8x8 pan. Bake for 20 minutes.

The cake has to cool completely before frosting. Ah the frosting, you can't go wrong with vanilla frosting! I had everything on hand, except for the heavy cream. Instead I am going to use milk, with some powdered milk added in. This way it's thicker than regular milk, but a lot less fattening than heavy cream. And because this frosting recipe only calls for 1/4 cup heavy cream, I'm going to make extra, then turn that into hot chocolate!
Again, I used the blender, well the food processor attachment this time, it worked really well!

Then I simply poured the icing over the mostly cool cake, I did not want to wait!

As soon as the icing is set I am all over this cake!!!
 Enjoy!
 |
| Photo from http://butteryum.blogspot.com |
Oh yes, a delicious banana cake! So now I have something new to try! Click here for the recipe.
 To start as always, gather your ingredients, I know it seems silly, but getting everything ready will make sure that you have everything you will need!
Then turn on the oven, to 375
 I know that the original recipe says this can be done by hand, but I prefer to use a blender to make sure it is smooth. Nothing is worse than getting chunks of butter, or banana in an otherwise perfect piece of bread, or in this case, the cake. Start with the butter, sugar, sour cream and egg.
 When it is smooth add the vanilla and the bananas. When you are using the blender it is not necessary to pre-smash the bananas. Which makes this an easier way to make this recipe.
While the bender is doing it's thing, grab a separate bowl, and mix the flour, baking soda and salt.

At this point mix, scraping the bottom of the bowl well and pour into a greased 8x8 pan. Bake for 20 minutes.

The cake has to cool completely before frosting. Ah the frosting, you can't go wrong with vanilla frosting! I had everything on hand, except for the heavy cream. Instead I am going to use milk, with some powdered milk added in. This way it's thicker than regular milk, but a lot less fattening than heavy cream. And because this frosting recipe only calls for 1/4 cup heavy cream, I'm going to make extra, then turn that into hot chocolate!
Again, I used the blender, well the food processor attachment this time, it worked really well!

Then I simply poured the icing over the mostly cool cake, I did not want to wait!

As soon as the icing is set I am all over this cake!!!

Subscribe to:
Posts (Atom)