Monday, June 24, 2013

When in doubt add bacon...

Roasted garlic is delicious...and bacon roasted garlic sounds even better!

There are two ways to roast garlic, in the skins cutting the top of the garlic bulb off, or by peeling each clove of garlic...Either way you decide to go, it's gonna be yummy!  I set my oven at 375

I wanted to maximize my garlic output so I peeled three bulbs of garlic

I then grabbed my jar of bacon renderings from the bacon jam and heated up a few scoops so it would liquefy

I lined a pan with foil, put the garlic in the bottom and then poured the bacon renderings over the cloves. sprinkling with Durango smoked sea salt from Spice Agent (tell them I sent ya) and some black pepper.

Seal the foil packet and pop in the oven

40 minutes later

YUMMY GOODNESS!!!

I'm going to stick these beautiful gems in a jar, in the fridge...and will use them later this week when I make my bacon garlic and mushroom pasta dish...stay tuned!

Wednesday, June 19, 2013

Apples

A while back I went on an apple binge...stocked up on one particular type of apple, the Ambrosia apple...happiness in a bite!  Unfortunately I have not eaten them all yet...and they are starting to wilt.  Time to make applesauce!!!

Apples, of all kinds, basically if it was in my crisper drawer it's goin in

Spices

Applejack Brandy!!!!

Melt butter and add apples

stir and then add the spices, and brandy

Cook until mash-able or use a food processor to break it down...and don't forget the sugar!!!
ENJOY!

Tuesday, June 11, 2013

God gave us food, the Devil gave us recipes!


Tea towel by Peg's Pantry
Oh how true.  And tonight it no exception!  I am making Coq au vin, thanks to my mom mentioning that it had...wait for it...bacon in it...and then turned my cook book to that page before she left today...so why not?

So I will be making the above, with green beans and potatoes on the side. I started by washing my vegetables and thawing my chicken.
I washed it all at the same time...
Make the Bouquet Garni

Fry the bacon....and while that is frying I chopped all of the veggies for the main dish and the side dish.
I never get tired of pictures of bacon frying...

Coat the chicken in the flour mixture then it's time to brown the chicken in those yummy yummy bacon drippings!


Add the onion and mushroom (I also added the carrots)

Add the remaining ingredients


Simmer for 1 hour.  It already smells DEVINE!


In the meantime I have the cast iron skillet with bacon, butter and onion starting to cook in the oven, with the yukon gold potatoes on top of it all.

With only 25 minutes left to cook I added the green beans on top of the potatoes and stirred it up as best I could to get everything coated in bacon and butter.

Serve it all together on a plate!

Enjoy!!!

Monday, June 10, 2013

Someone to do my bidding

Time for a new project!  A happy hooker is never happy only working on one project at a time.  So here is my next project

Can't guess?  Well I'm making a Minion.  Despicable Me 2 will be in theaters July 3rd, and this little guy (maybe more) will be attending!!
This is the minion Stephanie, the creator, made.  It is NOT mine!
It all started May 20th, I finally found the just right shade of blue yarn for the overalls, so I finally gathered everything I would need, and dove right in!  I will say, the creator of this pattern (click here) did warn that this was not for beginners, but when do I ever listen?

It took me FOUR tries, FOUR!  Just to get the body started...

But on the fourth attempt it finally worked!  And over the next three days worked on the tube.

May 23rd:
Finally got to the point of adding the hair, while watching Despicable Me of course!

I chose to do a minion with a single spike of hair, after I got all the hairs in that I wanted I wove the tail of the top of the head around, and glued everything in place


This has been an easy project to pack around, especially because I love large purses, I always knew there was a reason I carried bags others referred to as luggage...


May 25th-28th:
I got the head stuffed, and finished!  Well the basic part of the head/body

Just in time for a road trip! Thankfully my husband does almost all of the driving so I could sit and start on the pants!

We went camping for Memorial Weekend, so I had my bag all loaded up and had time to work on this project while enjoying conversation, a campfire and a very energetic niece who wanted to help, but was satisfied with me showing her how to do a simple stitch.  I may have to change my plans on making two and make three because I think she wants one too...

I have a water proof type bag that is perfect for carting a project to a campsite
May 28:
After a fun weekend away from home (and my bag of stuffing and detail material) I spent part of the evening making the arms, and putting on the features.

This means I am that much closer to completing this fun project. I just need to add the legs and goggles and I can hand this little guy off to his new owner!!!

I did spend some time creating my own sew in fabric labels.


This way I can put one on each of my projects!
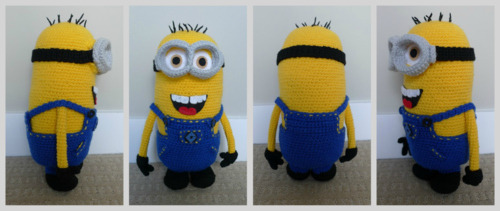

May 30th:
I am finally finished!!!! Ten days, from start to finish!  Not bad for a beginner!  There were times I wasn't sure I was doing a step correctly, and I really am going to miss this guy...but here he is.

Ba-na-na...ba-na-na-na...po-ta-toooooo!
The lesson here is, just because it says not for beginners doesn't mean a beginner can't do a project.  I hope his new owner enjoys him as much as I enjoyed making him!


Thursday, June 6, 2013

Down and dirty, time to distress!

After waiting 12 hours or so for the glue on the armrest to dry I finally found one of my DH's chains so I could beat the chair....seriously!

It really gives the chair an aged used look, and is fun!  But it is also dirty because the chain I grabbed had a bit of rust on it.

Don't worry, I didn't smash my shin, or fingers and the rust washed off!  I still have to go get a dowel to replace the funky buttons that used to be on the chair.


Update on projects past

Well it's been a busy week.  I started on the new project as posted yesterday.  It has taken off, and it crocheting up nicely!

I am down to only two rows of the Do it your way Afghan to connect then I can start connecting the rows


I can't wait to get this afghan done, I'm definately going to finish this one before starting on the ripple afghan I have planned for my living room.  For today I'm going to take a small break and go have fun with my mom.  I may do some more tonight when I get home!

Wednesday, June 5, 2013

My CADD strikes again!

Image of Ripple Baby Throw
© Lion Brand Yarn
I am a day or so away from completing my second Ami-gurumi project (post on first Ami-gurumi to follow soon), and here I am starting a baby afghan for my new niece, she is due in October.  I chose what I thought was a simple baby ripple pattern.  (click here, or on the picture)


It really is simple, and once you get the pattern down it goes quickly.  The part that I found to be super hard is the foundation row...after you make the ump-teen chains...I also used a different yarn that what is called for in the pattern.  I used Baby Bee Little Britches, in the colorway Charming.  I highly recommend using a site like Ravelry to "stash" your yarn collection, and to keep record of the projects you want to do, and the projects you have in progress.  Great for any yarn project!

I started with my 131 chain stitches

Then had to kick my dog off of my directions

And then spent considerable time growling, grumbling and crying trying to get my 2nd row done, after a while I got the hang of it, and it came out right!!!  No need to undo most of the row to start over, or heaven forbid the entire thing and re-chain to start over! And they say that crochet and knitting is supposed to be calming!  Well it is, once you get past the first row.

The blanket should crochet up quickly after this point...unless I get distracted by another project that is!

Saturday, June 1, 2013

Another way to eat bacon

Today is going to be a WONDERFUL day!  Why you ask?  Because right now there is a large cast iron dutch oven in my oven being seasoned
oooh, smoky!

And that means my blog readers...that today is the day...the day we have all been waiting for (well I know several people have been waiting for it).  I have thought about this day, and waited until I had everything I needed (the cast iron dutch oven) and today I will be making...dun dun dunnnnnn...

BACON JAM!!!!  (click here for recipe)


At 1:47pm I gathered all of my ingredients...I decided to double the recipe. And use 4oz jars, so that way I get 10 whole jars (which turned into 11, plus another spoonful...).  Especially because my partner in crime, her boss, my bestie, and my local cousin all want some...


Start with a non stick skillet and fry the bacon up in small batches then set aside...


And watch out for the hazards of cooking over 4 lbs of bacon...the trip hazards...otherwise known as my dogs.


After all 4 pounds of bacon have been fried (I finished a little after 3:30 pm), throw in the onion (I used Vidalia because that's my favorite onion) and the garlic and cook on medium heat until the onion is translucent, takes about 10-15 minutes.


I chose to use the metal sieve to drain the grease from the onion and garlic, and I am saving it for other cooking adventures...


Now bring out the cast iron dutch oven and put the 1 inch chunks of bacon, the onion and garlic and the rest of the ingredients (sans water) on the hot burner and simmer for 4.5 hours...stirring every 25-30 minutes (and adding 1/4 cup water if needed at that time)  I went ahead and set alarms on my phone to remind me to stir every 30 minutes, and then the final alarm at 4.5 hours to finish processing...It's going to be after 10pm before this is done and in jars...I wonder if this could be altered to be done in a crock pot...maybe next time...

Well it's FINALLY done, well done cooking!


Now time to put it bit by bit into my food processor so it can blend till semi-smooth.


Because it's done in batches I put it all into another bowl, so I can do the final tasting and add the honey...

The it's into a large collander for 20 minutes to let whatever liquid is still around drain off...


And drumroll please...into the jars...


Now to put this on breakfast biscuits, sammaches, hamburgers and anything else that bacon goes on!


Till next time!  ENJOY!