
Showing posts with label bread. Show all posts
Showing posts with label bread. Show all posts
Monday, September 5, 2016
Because Caaaarbs...
Oh internet, why do you do this to me? Easy No Knead Bread...Artisan Bread....I want to eat all of the carbs...

Tuesday, November 10, 2015
Recipes are guidelines, right?
I've said it before. I hardly ever follow a recipe exactly. Even when baking I add more spices than required because I love flavors! Tonight my pregnant self decided to try a new recipe I found on Pinterest. The name of the blog that featured this yummy photo is Bacon, Butter, Cheese & Garlic. The recipe? Baked Italian Chicken And let me tell you, the picture is SUPER enticing! See?
You want to make it now too don't you? And remember I'm pregnant, duh, so any blog that features some of my favorite ingredients must be a hit! The only issue I had with this when I started gathering my ingredients was that I noticed that the recipe doesn't include bacon....an oversight I'm sure! I also switched out minced garlic for the garlic powder.
So I decided to add bacon! It is a common pairing with chicken (at least in my house), so why not?

While the bacon was starting to cook I got to chopping....onions and tomatoes

The onions go into the pan with the bacon and the mushrooms (I got the pre-sliced)

While those are cooking I put the chicken in a pan...

And melted the cream cheese and mixed in everything else, and ran out of room in my bowl to add the spinach, so I just covered the chicken with it...

Then topped it with the cheesy-bacony-yummy sauce!

And popped it in the oven at 350, for 30 minutes...I think it is going to take a lot longer than 30 minutes, I checked it halfway through and the chicken is still VERY raw looking.....we shall see...in the meantime I am having a VERY hard time not eating the other half of the Italian bread I purchased to go on the side....VERY hard....

Once I determined we would actually be able to eat this meal sometime tonight...I started the Linguine I am serving the chicken on. And put the garlic bread in the oven. And sprinkled the shredded cheese all over the top of the dish!

Next time I am going to brown the chicken in whatever is leftover from the bacon onion and mushroom pan....give it a head-start to cooking! But this time, I'm just going to chow down, because I'm hungry and this smells soooooo good!!!!

Enjoy!
 |
| baconbuttercheesegarlic.blogspot.com |
You want to make it now too don't you? And remember I'm pregnant, duh, so any blog that features some of my favorite ingredients must be a hit! The only issue I had with this when I started gathering my ingredients was that I noticed that the recipe doesn't include bacon....an oversight I'm sure! I also switched out minced garlic for the garlic powder.
 |
| The artichokes are being drained...hence the reason they are not pictured |
So I decided to add bacon! It is a common pairing with chicken (at least in my house), so why not?

While the bacon was starting to cook I got to chopping....onions and tomatoes

The onions go into the pan with the bacon and the mushrooms (I got the pre-sliced)

While those are cooking I put the chicken in a pan...

And melted the cream cheese and mixed in everything else, and ran out of room in my bowl to add the spinach, so I just covered the chicken with it...

Then topped it with the cheesy-bacony-yummy sauce!

And popped it in the oven at 350, for 30 minutes...I think it is going to take a lot longer than 30 minutes, I checked it halfway through and the chicken is still VERY raw looking.....we shall see...in the meantime I am having a VERY hard time not eating the other half of the Italian bread I purchased to go on the side....VERY hard....

Once I determined we would actually be able to eat this meal sometime tonight...I started the Linguine I am serving the chicken on. And put the garlic bread in the oven. And sprinkled the shredded cheese all over the top of the dish!

Next time I am going to brown the chicken in whatever is leftover from the bacon onion and mushroom pan....give it a head-start to cooking! But this time, I'm just going to chow down, because I'm hungry and this smells soooooo good!!!!

Enjoy!
Thursday, March 26, 2015
Up early to bake
I have been wanting to attempt scones for a while now. Well attempt them again. I have made them once before but they were savory, and took forever to make. I found a new recipe to try so I got up really early (for me) so I could made a batch fresh before I went to my crochet group at church. I found the recipe online (click here) but wrote it down so it would be easier to make.

Saturday, November 30, 2013
Gluten for punishment (bun intended)
As if baking and cooking for the holidays wasn't enough, tomorrow I decided to tackle my delicious Low n Slow BBQ Pork Roast. And I wanted fresh bread to go with it. Not rolls, but artisan bread! So this is my adventure into making "Easy Homemade Bread" I found this recipe on Pinterest and have been keeping it in my To Make folder for just the right occasion. The blogger who posted the recipe makes it sound soooo simple! So here we go! (start time 6pm)
Gather the ingredients, and there really aren't many...

Then combine everything in a large bowl and mix till combined. I ended up having to do it by hand, because I couldn't get it mixed with the wooden spoon I was using. Next time I am definitely using the dough hook and the stand mixer.

The cover with plastic wrap and let it sit for 12-18 hours.

Fast forward to today and I must have done something right because is has risen and smells soooo yummy!

Time to take it out and form the loaf

And place the loaf on a floured piece of parchment paper because I don't trust just flouring a towel, especially one that my mom made me! Then wrap that bad boy up and let it rise at room temp for 1-2 hours or until doubled.
 About 30 minutes before it's time to bake this you need to get a dutch oven or other oven safe pot and put it in a cold oven and the heat the oven to 425
Now that it's risen it's time for the difficult part, this is the part that scares me a bit to be honest. You get the super hot dutch oven out of the oven and flip the dough into the pot, seam side up...


Ok, that wasn't too bad, heavy, and flour poofed everywhere but it's also cleaning day here so no big deal. Let it bake for 40-50 minutes
I wish you could smell via blog, cause my house smells soooooo good right now!
When the timer goes off remove the lid and let it bake for another 5-10 minutes until the top is a yummy golden brown.

The original blogger warns that once it's done, you put it on a cooling rack to let it cool and don't cut into it until the crackling stops, so hard to not start munching, but I'll be a good girl and wait till dinnertime.

Store in the dutch oven on the counter-top until you have eaten it all, or you could use it for croutons or in a breakfast casserole!
Gather the ingredients, and there really aren't many...

Then combine everything in a large bowl and mix till combined. I ended up having to do it by hand, because I couldn't get it mixed with the wooden spoon I was using. Next time I am definitely using the dough hook and the stand mixer.

The cover with plastic wrap and let it sit for 12-18 hours.

Fast forward to today and I must have done something right because is has risen and smells soooo yummy!

Time to take it out and form the loaf

And place the loaf on a floured piece of parchment paper because I don't trust just flouring a towel, especially one that my mom made me! Then wrap that bad boy up and let it rise at room temp for 1-2 hours or until doubled.

Now that it's risen it's time for the difficult part, this is the part that scares me a bit to be honest. You get the super hot dutch oven out of the oven and flip the dough into the pot, seam side up...

...Mercy, and here we go!

Ok, that wasn't too bad, heavy, and flour poofed everywhere but it's also cleaning day here so no big deal. Let it bake for 40-50 minutes
I wish you could smell via blog, cause my house smells soooooo good right now!
When the timer goes off remove the lid and let it bake for another 5-10 minutes until the top is a yummy golden brown.

The original blogger warns that once it's done, you put it on a cooling rack to let it cool and don't cut into it until the crackling stops, so hard to not start munching, but I'll be a good girl and wait till dinnertime.

Store in the dutch oven on the counter-top until you have eaten it all, or you could use it for croutons or in a breakfast casserole!
Wednesday, November 27, 2013
The first time (making Peggy Rolls) is always the hardest.
 Hello readers! I have been busy over the last few months, packing, moving, moving again, and unpacking. We lost our 13 year old dog, and adopted a rescue dog, I will introduce her later.
I have been enjoying my new abode with this awesome kitchen for about a month now and it's time to start blogging again. Besides, the island in the middle of the kitchen provides a perfect space for my computer so I can blog while cooking!
Taking a recipe, that has been perfected and then nicknamed after the person that perfected it, and duplicating it is a daunting task. Every family get together, on my dad's side, for as long as I can remember my mom made crescent rolls. Now called Peggy Rolls. These rolls are my FAVORITE bread substance EVER. So the one other time I made these, I had mom help me so I could take these rolls to take to my in-law's house. And naturally they love them just as much as I do...which is why I am attempting to make them today. Emphasis on attempting. Yes I'm terrified. I mean it's just ingredients, I have made many recipes some with disastrous results, but mostly with tummy pleasing turnouts. So why does this recipe throw me for a loop?
It's not all that difficult, and now that I'm in my new house and only 5 minutes away from Mom it should be easier to get her help...but I'm going to put my big girl apron on and do this myself...if not then Mom is only 5 minutes away and can come rescue me.
As I said, this recipe is simple. As always, getting everything out that you need to make the recipe, keeps you from forgetting something!


 Start by mixing the yeast, sugar and water, and warming your milk.
Then mix the sugar and butter together, I always cook with butter, it's better for you and I think it tastes better.


Then add eggs.
 Then finally add three cups of flour, and mix three minutes. This is also the point where you are supposed to add the salt, which I forgot because I was using it to prop the lid for the flour container. I added it a bit later, but before the final cup of flour...
Oops....
Once the mixer starts to sound like it's too much, switch to the dough hook and add the remaining flour, I ended up using 6 full cups of flour, and then called my mom to make sure the dough looked like it was supposed to. A soft dough should be silky in texture, yet not stick to your hands when you work with it.

So I sprinkled that bad boy with some flour (to keep it from sticking to the bowl), using a spatula around the edges and bottom to get good coverage all the way around and called it happy!
I used a plate to cover the bowl and set it aside (in a warm sunny place) to rise for 30-40 minutes note the reflection of two dogs in the bowl...they know I spill stuff and it's usually tasty stuff that I spill, or maybe they like to get underfoot so I will spill stuff....


I found her online over a month ago, I was looking for a full-grown-trained-good-with-kids-dog that was in a local rescue group, and I found her. Our other dog Stormy got sick back in September and we saw her across the rainbow bridge. Now Cinnamon has become (like two days ago) a part of this family.
Time to eat some lunch!
Ok it's been 30 minutes, and it's time to check the dough, see how it's rising.
Not quite done, so I'll wait 10 more minutes, and call Mom again, maybe she will come join me for the fun part of making these rolls!
There are two ways to use this dough, sweet rolls or crescent rolls. I'm gonna do both. Most of the dough will go towards crescent rolls, and I am going to use just enough dough to make a small pan of sweet rolls (twisted a bit) for my husband. Instead of the raisins we got some chopped pecans and I'm going to put those in the rolls.

Once the dough is doubled, plop it out on the pastry mat and divide into two balls, put one back in the bowl and set aside.

For the crescent rolls, using a pastry mat, roll dough into a circle

and spread with softened butter

I used a pizza cutter cause it's easy that way, to cut the circle into 12-16 wedges

then roll them up!

They need to rise 30 minutes or so, depending on the environment.

For the cinnamon pecan rolls, roll dough into a rectangle, one side slightly thinner than the other

spread with butter, cinnamon sugar, and pecans and roll up starting with the thick side.

Cut into the desired number of rolls and put into a lightly greased pan

And at this point the crescent rolls had risen to perfection and are ready to bake. Put them on the bottom rack in the oven and keep an eye on them.

When the rolls come out of the oven smother them with butter.

Then you can eat them, refrigerate them for later or even freeze them.
When the cinnamon pecan rolls come out of the oven the drizzle with frosting if you wish. My DH doesn't like a lot of frosting, hence the light drizzle!

And a huge thanks to My JoMama, who did come over and took some pictures of the making of these scrumptious treats! If you are interested, and you should be, head over to her blog, Peg's Pantry! And because she is such a great teacher with easy directions it really wasn't that hard to make these Crescent or Sweet Rolls. You can too!
Thursday, May 30, 2013
Old bread? Make a casserole!
There once was a girl, and this girl loved a good sale. So one day she found a great bargain for bread, and knowing that the price was just right decided to buy two loaves. Even though she and her DH didn't eat that much bread. Bread keeps in the freezer! She had seen her mother do it time and time again. So once the first loaf was eaten she got the second loaf out of the freezer and put it in the fridge...unfortunately that loaf ended up stale and partially hard...oh well...
I kept that loaf in the fridge for a month...yes month old bread...yummy...I was planning on making it into croutons, or bread crumbs...instead I got a craving for a make ahead breakfast casserole! Most of the time I make breakfast casserole with potatoes, tater-tots, potatoes o'brian, you get the idea. But I have a recipe for overnight casserole that needs bread...of course I don't usually follow recipes, even ones that I created.
Start with roll pork breakfast sausage, brown it then add onion

Then clean and slice some mushrooms
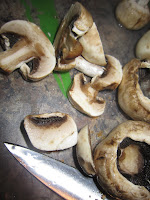
While that is cooking slice the bread, of course you don't have to use old bread, any bread will work

Combine the sausage and the bread, then dump it into a large pan, that you greased...and press it down.

In that same bowl combine a cup of milk, 8oz sour cream, and 8 eggs, I used my stick blender just because I can, and whipped it up. Then added powdered mustard, smoked bacon chipotle sea salt, and black pepper, then whipped it up again before pouring it over the sausage bread mixture.

Top with cheese

Cover it with foil and stick it in the fridge. The next morning bake at 325 for 60 minutes or so.

Enjoy!
Subscribe to:
Posts (Atom)