Wednesday, December 1, 2010

The Tassie

My final project this semester for Restaurant and Store Planning was to create a concept, menu and layout for an existing space.  The following renderings are from that project, all of the drawings were originally done in Auto CAD, then imported into Google Sketch-up and rendered, and otherwise created.  All of the materials shown in the renderings are the actual material I would use in the space.


Drawing class...

Series drawing, each is 24" x 30", charcoal

This semester I have also been in a drawing class.  Most of my work I have not posted prior to this, but I am posting my favorites now!  So enjoy!


Figure Drawing, charcoal pencil, 20 minutes

A Certified Completely Unofficial end to the semester.

As the semester draws to an end, (two more days this week, and then finals) I look back over all I have learned this semester, not only in Graphic design, but in all of my classes in my maiden semester at UCMO.  How far we have all come, as friends, and in what we have learned.  It does seem like just yesterday, to use that old idiom, that I was starting this blog, unsure what to write, or what to even say.  Sixteen some-odd weeks and several sarcastic posts later, I have emerged a better designer for what I have learned in Graphic design.  Who would have thought that I would fall in love with a MAC computer (yes you can laugh at me now, who would have thought) but I have learned to appreciate the new programs that I have learned to use!   Of course as in live, learning is a never ending process, so I will make an effort to continue to use and learn more about the programs I "found" this semester.

As for my final project in Graphic Design, my zine, I am quite pleased at how it is coming together.  There are just a few more touches needed to make it complete, and then I can turn it in!


With the end in sight, it is time to post, and then change the name of this blog, but not by much!  I will continue to post projects (although from now on it will probably be interior design projects) and insight into my "world."

As it was, and still is, best said...Onward, forever onward!

Monday, November 8, 2010

Vikings rule!

 So the zine topic I have decided on is "how to play Kubb" pronounced koob. 


 Here are a few pictures I have happened upon that may be of use.  Of course a picture or diagram of the playing field is necessary...maybe more of a rough sketch for the actual zine, depending on how it is coming together, and a picture or other diagram of the pieces, and numbers needed... the basic rules are a must.  This game is widely open for interpretation for the skill level of the player, or intoxication level...however you want to look at it!  Yes this is a game that in the rules states that it should not be easy and if games end too soon it is because the players are not taking advantage of the downtime between turns to drink beer.  Layout will be playful and loose as is the game itself!  So here it goes....

Final project for the SEMESTER!!!! Yeahz!

Well it is that time of the semester where we get final assignments for each class (or hopefully we do) and we start thinking about Thanksgiving and Christmas breaks...In Graphic design our final assignment is to create our own Zine, a "How to..." Zine.  We get to choose the topic, and we will design it, and publish two copies, one to keep for our portfolio and one for the instructor to keep. 

For this assignment we will be using InDesign, another adventure for me!  And another fun part, we cannot print in color, if we want color in the finished piece we have to add it after the printing is done, so break out the markers, colored pencils and paint!

I am having a more difficult time this go around coming up with a fun and quirky topic for this assignment, although I think I have it narrowed down to "How to cope when your favorite TV show ends" and "How to watch or enjoy a NASCAR race."  Anyone want to weigh in and give me a suggestion or vote for one of the topics above?

Until later!

Crossing the finish line!

Use of the toothpicks was successful!  And the bench is now done!!!
Beginning
Finished!

I will have to say that I never thought it would take so long to get to the end, but I am very pleased with the results! And I believe that I will continue to refurbish pieces to suit my space. 

Back in September when we got this assignment, we were given two choices, re-furbish a piece we chose, or use that piece to make something new.  Although I chose to clean up and refinish my piece, I also did something new.  I did get to learn a lot about working with wood, and furniture making.  As with everything I'm sure there are things I would have done differently, and it's possible that I still make a few changes, just not right away.  Although next on my list is the white chair seen in the finished picture...it is now out of place in my living room...so bring on the sewing machine, sand paper, and the other paraphernalia needed to turn this found object (yes i found it in the basement, it was left by the previous owners and we never threw it out) into a piece to be proud of!

Monday, November 1, 2010

A key is necessary...

Creating a key, and a title was necessary for the project, of course!  So after a bit of tweaking, here is the finished Infographics poster!  Comments welcome!

Horray for Infographics!

Here is the "finished" poster depicting my life...I still have to create a key (I think) other than that it is finished!  The paintbrush and wrench represent work, our initials are the "me" time we each get, the Zzzz's should be pretty self explanatory (sleep time) and the male/female symbols are for the time we spend together (awwww).  As for the numbers, they are the week numbers.  I wish I had been tracking for the last week too, because the numbers would have changed a lot!  Partly because I only had school thru Wednesday...so I got a lot more sleep!! 

Sunday, October 31, 2010

Caution! Metal is hotter than it appears!


Well it's been a while since I have posted about the bench progress.  The custom handles have been made, and sprayed, and they do look great!
Note to self, when asking the metal worker to change something, don't actually touch the metal that he was just grinding on...it really is hot even if it doesn't look like it..


As of today the work that remains is as follows, attach top to bench, add friction lid support, and cover bottom of lid with "decorative" cover (so you can't see the staples and whatnot).
 
Today as I was working to attach the upholstered top to the bench a realization hit me...i had not really filled the holes from the previous hinges, and they weren't going to line up with the new hinges.  And as we all know (or are about to learn) you cannot drill a hole next to another hole and have the new hole be stable...so...what to do...in a moment of pure brilliance (at least that's what I tell myself) toothpicks were cut down to size, and glued and hammered into the existing holes!  
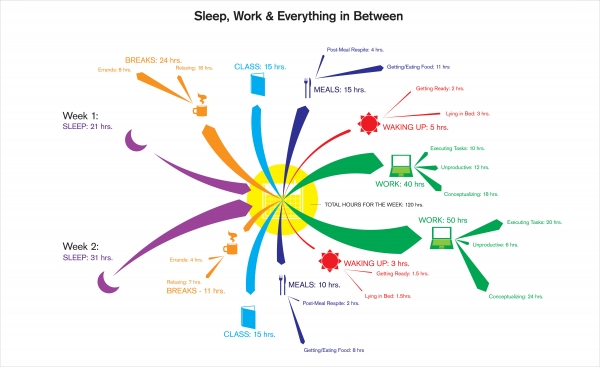
 
Of course that means that it will be tomorrow before the top can be actually screwed down...oh well!  All's well that ends well!


.

Friday, October 22, 2010

infographics information

For the past almost three weeks (Sunday is my last day to keep track of times) I have been tracking data for myself and my boyfriend!  After thinking about it I am going to put everything into four categories...Sleep, Work, Couple, and Me.  And I'm sure some of you are thinking, but wait, Dayna, you don't work!  Well technically I don't get paid but I do work, it's called school, homework and housework.  All the other categories are self explanatory.  As I've said, I will have three weeks of data to use, and am planning on showing the 7 day week...It will be interesting to say the least to see how this all comes together!  YEAH!

Monday, October 18, 2010

Infographics Ahead!

Hey all!  Today marks a new adventure into infographics! In this post I will be showing several posters/graphics that interest me...of course for the visual quality not necessarily for the content...so keep that in mind.


Wednesday, October 13, 2010

Renderings

Greyscale Marker Rendering
Some of my renderings from semesters past...
Pencil Rendering

Full Color Markers and Pencil

Greyscale Marker Rendering

Pencil Rendering

Full Color

Monday, October 11, 2010

More tidbits of bench work!

 The next step in my process was to install the tee nuts (pictured on the right).  The first step in this process was to make pilot holes in the metal cradle, then place the wood portion in the cradle so holes could be marked in the wood.  A mark was also  made on the inside of the legs of the cradle to indicate the front and the back.  These marks can and will be removed after the bench is assembled..The pictures below show the next steps for installation.


First Step, drill center hole, and then the recess for the tee nut.
The Tee Nut installed, used so there is not a hole on the backside of the wood.  They will be hidden once the metal frame is put on.

Monday, October 4, 2010

Wednesday, September 29, 2010

Two more ideas for PSA


I wanted to explore other options for my edgy, in-your-face, PSA poster on Texting and Driving.  These are two other concepts I have come up with...Any and all feedback is welcome!  My original poster is posted on a previous post....so please compare!

Monday, September 27, 2010

Legs

The legs/cradle of the bench are now done and the finish has been removed.  After looking at it together (to mark the holes) I'm thinking that I should just leave it natural and not do any faux rusting....any thoughts?

PSA take 2!

Frankie told me that the letters were hard to read as they were.  So I changed the fill color...how does this look?

PSA as it is today...

I really do want comments about this poster.  So please let me know your thought about it.

Sunday, September 26, 2010

Contracting out welding jobs...

So for this bench I decided to use metal for the legs and as a band around the base. Fortunately for me I have a welder at my disposal (the person and the machine)!  So the leg portion of the bench is going great guns!  There has been one setback (but nothing huge) the legs need to be tack welded in place (as in on the bench) so there is a small burn in each corner...as i said, not a biggie!  I can just sand the corners and re-stain them...

After measuring and cutting the pieces with the grinder it my welder laid the pieces out on the actual bench to ensure an exact fit!  The next step is to spot weld it in place, then remove and lay down the actual welds.

Friday, September 24, 2010

And it's STAINED!

View of the "front" stained.  The stain was not as dark as I expected, probably because the wood is pine, and stains are always lighter on pine than on other woods.  But I like it, the front did some weird things, there are white places around the once dark spots.  I'm going to leave them, and just put the gloss coat on.  It ads a certain old-world or worn charm.
The inside of the bench stained a lot differently than the outside did...very interesting...gonna leave it as is...