Sunday, April 22, 2012

Sometimes you just want to cook

After what seems like forever since I last made a big meal, tonight I decided to once again, go all out and create a feast. Tonight's menu is BBQ chicken, horseradish scalloped potatoes, mozzarella tomato and basil stuffed baby-bella mushrooms and peppered bacon brussel sprouts.  As I said, I got a hankering to cook.


The BBQ chicken is simple.  Season with your favorite BBQ rub, bake and then smother with your favorite BBQ sauce.


Next I found a recipe for scalloped potatoes, and made it my own.  Click here for the recipe.
I've never made brussle sprouts before, and i didn't feel like finding a recipe, so I decided to brown some black pepper bacon, add a bit of butter then toss the sprouts in and let them "wilt" a bit.  Quite tasty!


Overall dinner was very yummy!  The kitchen is a wreck, but my tummy is happy and full!

Wednesday, March 7, 2012

Mother Hubbard's cupboards are bare!

Yeah, we missed grocery day...you know, that day that you both have free to go shopping...so we are going to have to wait until Friday...so until then i'm on a scavenger hunt for food!

Tonight I decided to try pizza roll ups...a twist on what I have created before.  And again, a super simple recipe...4 ingredients or less, unless you want to get crazy with your pizza stuffing!

One tube crescent rolls
Mozzarella cheese
Pepperoni
Sauce for dipping

Preheat the oven (my rolls said 375) and lay out the crescent rolls and cover the rolls with pepperoni

Then with the cheese


Roll each one up making sure the tail is under


Cook for 12 minutes

At this point you can preheat your pizza dipping sauce, or if you are like me, skip the sauce all together!

Make sure you don't burn your mouth eating these little gems! 

Tuesday, March 6, 2012

Everyone loves chicken...right?

Hello my followers!

Tonight's fare is Garlic Chicken and my Cast Iron Rolls.

The chicken like most of my recipes of late was found on pinterest.  So this will be the first time I'm making it...

The rolls have been thawing and rising for almost 4 hours...and filling my kitchen and house with the yummy yeasty smell!

Helps that I've had my windows open for the last 6 hours!  YEAH for a warm day in March!  Tonight I'm going to do garlic parmesan rolls, which is the joy of this recipe, you can change up the topping for whatever flavor you want!  Just brush the tops before you bake, then again (just the butter or olive oil) after you bake and chow down!

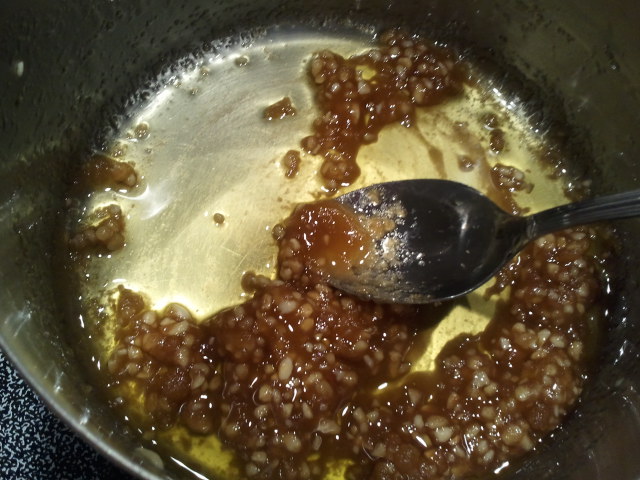
But first things first, the chicken.  This is an easy 4 ingredient recipe, found in full on food.com is super simple, and you really can't go wrong with garlic and brown sugar!

Saute the garlic and oil, then throw in the brown sugar and mix

Cover the chicken in the mixture and bake for 15-30 minutes (depending on the thickness of your chicken) at 500.

After the chicken is done, reduce the temp and throw in the rolls.

Don't forget a veggie on the side!

Consume!

Tuesday, February 14, 2012

Best Chicken Enchiladas EVER! (easy too)

Happy Valentine's Day everyone!  It is a day for love, and I LOVE these enchiladas!!!  This go around I'm taking my time, so prepare for a lot of photos!!!


I realize there is no chicken in the above picture, but it's thawing in the microwave.  The joy about this recipe is that you can seriously nuke the whole thing!  Of course I am going to make most of it on the stovetop, cause I love using my new pan! Most of what you see above you can find, except for the salsa...my mama made that...and it is the BEST salsa in the whole world, and ruined me for any store bought salsa.

I don't really measure, especially onion and garlic, cause I simply love onion and garlic.
Sweat the onion in a pan (use oil) then add the garlic when the onion is almost done. Don't want to overcook the garlic.

In the meantime, be cooking the chicken in the microwave or any other method you choose.  When it is cooked throw it into your stand mixer, yes seriously.  Lock it down and turn it on medium and let it go.

Before

After

Add the chicken and spices to the pan and stir to combine and heat.

Then add the cream cheese and stir together.

Fill the flour tortilla shells, this recipe should make more, but I like to really stuff my shells so I end up with around 6 total, and I just put them in microwavable containers so they are already read for lunch!

After these are ready to go, prepare the cheese topping.  In deference to Valentine's Day I'm going to use the Queso Blanco Velveeta so the salsa turns it nice and pink!  And as usual I'm making more than what I need for this recipe because it is soooo yummy and perfect for dipping! Cover the tops of the enchiladas with the cheese mix and cover and put in the fridge.

When you are ready to eat, just reheat the enchiladas and you are ready for a party!


CHICKEN ENCHILADAS


½ cup chopped onion
1 garlic clove, minced
1 tablespoon oil
2 cups chopped cooked chicken
1 can (4 oz) chopped green chilies
¼ cup chicken broth
2 teaspoons chili powder
1 teaspoon ground cumin
4 oz cream cheese, cubed
6 flour tortilla (6 or 8 inch)
¼ pound Velveeta, cubed
2 tablespoons milk
½ cup chopped tomato, divided (I use salsa)


Microwave onion, garlic and oil in 2-quart microwave-safe casserole on High 2 – 3 minutes or until tender, stirring after 2 minutes.  Stir in chicken, chilies, broth and seasonings.  Microwave on high 4 minutes or until thoroughly heated.  Add cream cheese; stir until cream cheese is melted.  Spoon 1/3 cup chicken mixture onto each tortilla; roll up. Place, seam side down, in 8-inch square microwave-safe baking dish.  Microwave Velveeta, and ¼ cup tomato in medium microwave –safe bowl on high 2 to 3 minutes or until Velveeta is melted, stirring after each minute.  Pour sauce over tortillas; top with remaining tomatoes.  Microwave on high 6 to 8 minutes or until thoroughly heated, turning dish after 3 minutes.


Makes 6 servings.

Monday, February 13, 2012

Balsamic and Onions and Mushrooms! OH MY!

Sundays are a great time for pot roast.  Especially since mother nature has decided to give us an ACTUAL winter, at least a weeks worth of winter weather.  So this morning while I am making fresh blueberry muffins I'm also starting tonight's dinner!

My DH loves blueberries.  And as luck would have it his parents brought us a Valentines bag of fresh fruit, which included a pint of blueberries!!!  The muffins I made came directly from the 1976 Betty Crocker cookbook, the orange one.  I love this cookbook, my mom has it, and when I found it for $12 I had to buy one too!  The consistency was dense, but overall good flavor and super yummy still warm!

On to the main event! Balsamic and Onion Pot Roast!

I tried to follow the recipe as closely as I could, but bottom round roast was much cheaper than chuck roast, so I am using the round roast.  All of my other changes are noted in the recipe.  (see above link)

I have also decided that I need a sous chef...because trying to do all of the steps, and photograph is next to impossible for some recipes...this one is included.  I did manage to get a picture of everything IN the Crock-pot.


Dinner was wonderful, I am glad I added the extra tomato sauce, the balsamic was almost overpowering, also could be that my balsamic isn't the highest quality...But in the end this recipe recieved the thumbs up from DH.  And a "you can make this again" too!

**Last night after eating this delicious meal complete with garlic mashed potatoes and gravy, we both almost passed out on the couch from overeating...which is why I'm posting this now...

Saturday, February 11, 2012

Easy Italian

Hello my readers! A lot has been doing on since I last posted...school started, my last semester, and I'm planning a wedding!!!  :0D

Tonight I am preparing a meal of stuffed manicotti, garlic rolls and Italian sausage!  I found the recipe for stuffed manicotti on Pinterest and had to try it.  I love stuffed pastas, but this one did not require boiling the noodles first, a MAJOR bonus for me!

The rolls were super easy!  I went to the store and purchased a 12 count frozen white roll dough...see easy!  Then I greased my cast iron pan with olive oil and placed the rolls in the pan...then you wait 3-5 hours...


I did change the manicotti recipe a bit...I threw all of the stuffing ingredients in the mixer instead of doing it by hand.  Saved me time, and energy.  The blog where I found this says to use a pastry piping bag (which I don't have but now want) or a gallon ziplock bag with a corner cut off.  The hole I originally cut in the bag was not big enough to squeeze the super thick mixture through, and I probably put too much in at once (like the whole batch).  So I re-cut the bag, and then the hole was too big...so I stuffed each shell by hand...with my fingers...fun, time consuming and messy!  Next time I'm going to make sure I have a pastry piping bag...now time to throw them in the oven for 50 minutes!!!  Time to take a break until it's time to start the sausage and rolls.


I love garlic, it's become an addiction for me lately.  There are also health benefits to eating garlic.  I mixed butter with the juice from my jarred minced garlic...YUM!!!  Then brushed that on top of the rolls BEFORE baking (just follow the package directions for baking temp and time).  After they are done and nice and brown, brush them (or soak) them in garlic butter again!  Serve in the cast iron pan, it keeps them nice and warm!


Enjoy a wonderful dinner!

Sunday, January 8, 2012

Two pot pasta meal.


What started out as quick pasta night quickly turned into me rushing to the store for more Mushrooms, as the ones in the fridge were slimy. :(

Oh well, glad I have my mushrooms!  I also get to use my new pan (again) to make more of a pasta casserole!  I kinda made this recipe up as I went.

1 sweet onion chopped
1 lb hamburger
8oz sliced mushrooms
1 box pasta (your choice)
8oz ricotta cheese
16oz shredded pizza cheese or mozzarella cheese
1 jar of your favorite pasta sauce
Italian seasoning (to taste)
1 tsp minced garlic

In a large pan (that is oven save) brown your hamburger, onion, mushrooms and garlic.  Also start your pasta water to boil.  And cook pasta as directed.

Drain the juices off the hamburger mixture.  Add to the pasta with the sauce (about half the jar), ricotta cheese and half the shredded cheese, stir to combine.  I found it was easier to mix all of this in my pasta pot then transfer back to the large oven safe pan, a lot less messy this way.  

Sprinkle the remaining shredded cheese over the top; I also used some Parmesan cheese.

Pop in the oven at 350° for 10 minutes or until cheese is melted and dish is well heated thru.


Serve and Enjoy!