There once was a girl, and this girl loved a good sale. So one day she found a great bargain for bread, and knowing that the price was just right decided to buy two loaves. Even though she and her DH didn't eat that much bread. Bread keeps in the freezer! She had seen her mother do it time and time again. So once the first loaf was eaten she got the second loaf out of the freezer and put it in the fridge...unfortunately that loaf ended up stale and partially hard...oh well...
I kept that loaf in the fridge for a month...yes month old bread...yummy...I was planning on making it into croutons, or bread crumbs...instead I got a craving for a make ahead breakfast casserole! Most of the time I make breakfast casserole with potatoes, tater-tots, potatoes o'brian, you get the idea. But I have a recipe for overnight casserole that needs bread...of course I don't usually follow recipes, even ones that I created.
Start with roll pork breakfast sausage, brown it then add onion
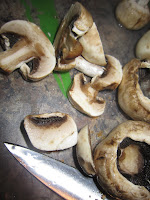
Then clean and slice some mushrooms
While that is cooking slice the bread, of course you don't have to use old bread, any bread will work
Combine the sausage and the bread, then dump it into a large pan, that you greased...and press it down.
In that same bowl combine a cup of milk, 8oz sour cream, and 8 eggs, I used my stick blender just because I can, and whipped it up. Then added powdered mustard, smoked bacon chipotle sea salt, and black pepper, then whipped it up again before pouring it over the sausage bread mixture.
Top with cheese
Cover it with foil and stick it in the fridge. The next morning bake at 325 for 60 minutes or so.
Enjoy!
There are a lot of blogs out there, mine is just one of them. But I can promise some interior design fun; crafty projects; other interesting tidbits; great recipes; advice; and awesome pictures from the crazy adventure I call life!
Thursday, May 30, 2013
One man's trash is this woman's new project!
Yes the title is true. Memorial weekend we were headed out to go camping, as we were leaving the neighborhood I spotted a wood frame chair sitting on the side of the road. In just a glimpse I knew that if I could get my hands on it, what a project it would be! So I called my neighbor and partner in crime. She and her husband wrestled it into their car, and down to my house and into my garage so it wouldn't get taken by someone else, or soaked by the storms that descended upon KC before we got home from camping. My poor DH, he's none too happy. But I can understand why, we are trying to paint the garage and clean the house out so we can sell it and move...tee hee...

He must love me because instead of insisting that I get rid of the chair, he's letting me keep it, and refinish it! It's pretty rough right now, and will need a lot of work before it takes it's place in our home. But this chair has great bones, and with a little elbow grease and some TLC this is going to be an awesome addition to our living room!
I had to rip out the bottom, and take out the springs, it's pretty much wasted. Someone must have used this chair as a trampoline.
Once that is out I need to go get some jute, or other suitable fabric to create a woven base instead of a metal and spring base.
After I finally manhandled the old spring system out I popped the few wood button covers off and put them to the side. I have decided to simply plug the holes with a wood dowel and sand it smooth, I like that look better. I did start sanding the arms and discovered that the bottom of one of the arms was loose, so I glued and clamped which ended my work on the chair for tonight.

Tomorrow is a new day! I did notice that this poor chair has been used and abused, so it will take a lot of sanding and shaping to get the arms to look like new again...but it was a free chair...so I'm game!

He must love me because instead of insisting that I get rid of the chair, he's letting me keep it, and refinish it! It's pretty rough right now, and will need a lot of work before it takes it's place in our home. But this chair has great bones, and with a little elbow grease and some TLC this is going to be an awesome addition to our living room!
I had to rip out the bottom, and take out the springs, it's pretty much wasted. Someone must have used this chair as a trampoline.
Once that is out I need to go get some jute, or other suitable fabric to create a woven base instead of a metal and spring base.
After I finally manhandled the old spring system out I popped the few wood button covers off and put them to the side. I have decided to simply plug the holes with a wood dowel and sand it smooth, I like that look better. I did start sanding the arms and discovered that the bottom of one of the arms was loose, so I glued and clamped which ended my work on the chair for tonight.

Tomorrow is a new day! I did notice that this poor chair has been used and abused, so it will take a lot of sanding and shaping to get the arms to look like new again...but it was a free chair...so I'm game!
Saturday, May 18, 2013
Triple D Chili
Last night my DH and I were watching "Diners, Drive-ins and Dives" and it seemed like every episode we watched had hot dogs, so of course we both got hungry for hot dogs! Chili cheese dogs to be precise. One particular episode the owner showed how to make chili from scratch. So that is what I am attempting to replicate tonight.
There is no set recipe, and there are no measurements aside from the pound of hamburger. So you will need to gather
After spending several hours at the Zoo for a birthday party I used the easy route and used the food processor to chop up the carrots and onion.
Set a pan on the stove and pour in a blop (yes this is a technical term) of each of the oils. The sweat the carrots and onion.
Once they are sweating good add the hamburger
And the spices, all just kinda thrown in depending on how you think you will like it. And I forgot to mention that you need some water (12-ish ounces) too...so add that now.
Yes, at this point the hamburger is raw but that is OK because this is going to cook and simmer and make you drool for 30-45 minutes. After 15 minutes or so taste the chili to see if you like the flavors, and then you can add more of any of the spices, whatever you think it needs.
Once the chili is done it's time to assemble the chili dog! Bun, grilled or boiled dog, top with chili and cheese.
ENJOY!
There is no set recipe, and there are no measurements aside from the pound of hamburger. So you will need to gather
 |
| Canola Oil and Olive oil |
 |
| Beef Soup base |
 |
| Ketchup and Mustard |
 |
| White Vinegar and Worchestershire sauce (not pictured) |
 |
Paprika
Chili Powder
Oregano
Garlic Powder
Cumin
Ground Pepper
|
 |
| Onion and Carrots |
After spending several hours at the Zoo for a birthday party I used the easy route and used the food processor to chop up the carrots and onion.
Set a pan on the stove and pour in a blop (yes this is a technical term) of each of the oils. The sweat the carrots and onion.
Once they are sweating good add the hamburger
And the spices, all just kinda thrown in depending on how you think you will like it. And I forgot to mention that you need some water (12-ish ounces) too...so add that now.
Yes, at this point the hamburger is raw but that is OK because this is going to cook and simmer and make you drool for 30-45 minutes. After 15 minutes or so taste the chili to see if you like the flavors, and then you can add more of any of the spices, whatever you think it needs.
 |
| Almost done! |
ENJOY!
The importance of checking gauge
Well I finally finished my first hat project...its a tad small...honestly it's child sized! Oops. Guess skipping the first step of checking gauge was not that smart. I just assumed that the gauge shown on the skein was what I needed to use.
I am a tight hooker. So in reality I will have to use a larger hook to create the hat in adult size.
I also changed up the directions from the original pattern to use a contrasting color for the finishing band, and I added a flower (pattern here) because the child recipient of this hat loves pink!
Now I know to check gauge before I start a project like this...ready for the next project!
Happy Hooking!
Friday, May 17, 2013
A hat...even though it's spring
My crochet afghan sits unfinished...but closer to done. I have been working on joining the squares
Once the rows are all joined I can join the rows and do an edge all the way around.
So yes it is taking me a while. Partly because I've been sitting on that bed so I don't disturb my pattern that I have laid out. And the other part because I have C.A.D.D. (Crochet Attention Deficit Disorder) and want to start and do other projects!!! :) especially ones that work up faster than the afghan...mercy.
So I have completed a prayer shawl for a friend. The pattern can be found here. It took several days, mostly crocheting while watching TV at night. But here it is!
I can't wait to give it to her. I'm sure she will be surprised!
I have also decided to go ahead and make a hat. I know that it's the middle of May, but feels like July already. But hey, I have the yarn, I have the time, and I have someone to give it to! Bah ha!
So here I sit, at the computer so I can see the pattern...saves trees this way. Although it does confuse my dog a bit.
 |
| "Wha'cha doin Mom?" |
I worked on the new project till about 230am, and was still not quite done, it's going to take another few uninterrupted hours of crochet time.
Tuesday, May 14, 2013
Two years later...
Ah I love completing a project...of course it's better when the project is completed in a "decent" time frame. Our kitchen project from start to finish took 753 days from the start date (April 23, 2011) to the end date (May 14, 2013), end date included. Or 2 years, 22 days...
Alternative time units
That is a long time to wait for something as spectacular as the finished kitchen. Of course "finished" is not loaded...I still have to load the cabinets.
The custom cabinets were created by my DH and are very NICE. This will be a wonderful selling feature for our house.
The rest of the kitchen remains the same.
Alternative time units
- 65,059,200 seconds
- 1,084,320 minutes
- 18,072 hours
- 107 weeks (rounded down)
That is a long time to wait for something as spectacular as the finished kitchen. Of course "finished" is not loaded...I still have to load the cabinets.
The custom cabinets were created by my DH and are very NICE. This will be a wonderful selling feature for our house.
The rest of the kitchen remains the same.
Subscribe to:
Comments (Atom)


